Celtic Harp Blog

Why You Always Stumble in the Same Spot: Fixing Musical Mistakes

There is a reason why you always stumble playing music, often in the very same spot. And I’m going to give you the secret to fixing musical mistakes. But first, let’s . . .

Set the Scene

You’re playing along, feeling the flow of that lovely little Celtic tune when all of the sudden the panic arises. Here it comes! That really tricky spot!

instead of panicking, fix your musical mistakesLike a deer in the headlights, you freeze up, then stumble forward. Oh, how you wished this time it would be different. Alas, terror is not helpful to fixing musical mistakes. Nor is the frustration that comes from having the same problem occur over and over and over.

Diagnosing and Fixing Musical Mistakes

If you repeatedly stumble in the same place in your harp music, that means you have a practice spot. A practice spot is a recurring musical mistake that is demanding individual attention, like a new string that won’t stay in tune.

Maybe you already know you have a practice spot. Maybe you’ve even tried the practice techniques on this page. (If not, what are you waiting for?) In spite of what you’ve tried, you still can’t seem to make the leap from the easier part into that new territory. Transitions are hard, aren’t they?

The good news is, there is a simple and fail-safe technique to fix your practice spots or musical mistakes. I call it the “Play/Place Technique.” That’s a utilitarian name, I know, but I hope it will help you remember exactly what you need to do.

So, what’s the bad news?

Well, all of us resist taking things apart, as we’re addicted to forward motion, nowhere more so than in playing music. If I tell you–as I’m about to–to play the last bracket of the easy phrase, and then just replace the first bracket of the troublesome one, WITHOUT playing it. you’re going to resist.

Go ahead, try it. It may sound simple, but it’s not easy. Unless you are super dedicated and experienced with practice strategies, your urge to play what you’ve just placed will be really strong. Like, last-cookie-in-the-cookie-jar strong.

Here’s why you want–but must resist–that urge to play on. Your brain adores the satisfaction of playing on. However, for your brain to actually learn the motion of going from one bracket to the next–through what has proven to be a tricky transition–you have to give it the smallest, most doable chunk. And then repeat it enough times for it to become automatic.

By playing the bit before the spot, and then replacing the next, you’re giving your brain that smallest chunk. Try it now, with the tricky little transition that causes the problem.

What If My Fingers Don’t Cooperate?

Now, your brain may have still thrown up its hands, as if to tell you that it doesn’t know where to put those fingers for the second bracket. That’s critical information letting you know that your brain simply needs more guidance.

To continue on the quickest path to fixing the musical mistake, you’ll need to add one more thing: talking out loud. (Really, proven by research to be the best thing ever–I am not making that up).

How can talking out loud help you fix a musical mistake? You will patiently explain to your brain that, while the first bracket is four notes stacked up in a row, the second one has a gap near the bottom, making it look like a monkey with a tail (or whatever your brain will like). In fact, the gap that makes it look like a tail is over the B string, so you tell yourself you won’t put a finger there.

Or, maybe you notice that your whole hand has to shift down, exactly a sixth, and say so out loud. Or, you notice and remark on the fact that there is a common note between two unconnected brackets–the A string!

Now that you’ve given your brain the missing puzzle piece of information to fix the mistake, you’ll go back to the Play/Place Technique. This time, your fingers will know exactly where to go.

Play the first bracket, then place the second. If they’re connected brackets, pretend that you’re swinging on that pivot note, and place the remaining fingers exactly at the same time. You may only need to Play/Place a couple of times now, because your brain has had an aha moment and, lo and behold, it suddenly knows what to do.

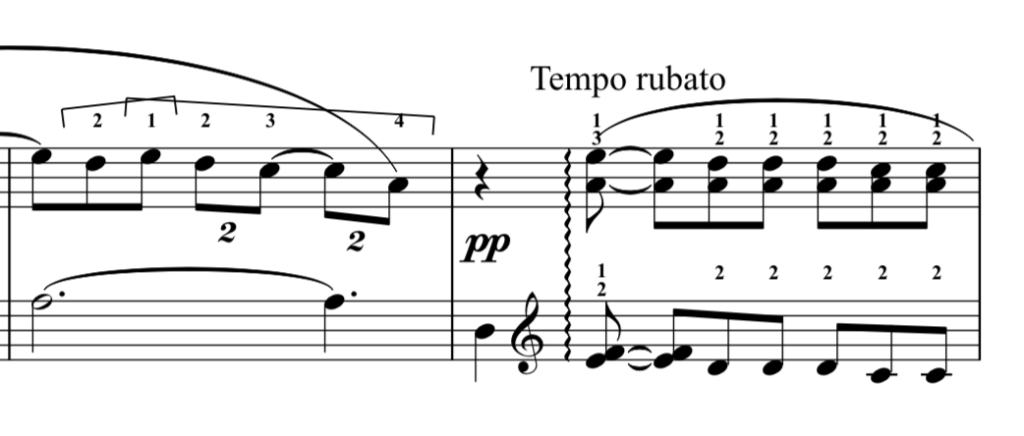
At the request of a blog reader, I’m adding a visual example to clarify this process. Here are two measures from Clair de Lune).

The first task is to identify your stumble spot.

  • Is it getting to the low D (under the pp) from what came before?
  • Is it getting from the low D to the chord that comes next?

Let’s say it’s the latter. You might tell your brain something, like, “I play that low D with finger 4 and then leap just higher than an octave to land the E/F with fingers 1 and 2. I aim my thumb for the colored string (F); that helps me see it.” That’s the Talking Out Loud part.

Next, you use the Play/Place Technique. In this case, you play the D, then land the E/F, without playing it. Do that until it’s easy.

Next, look at the right hand and talk yourself through how to get from the last A (before the pp), to the chord. You notice and tell yourself , “I’ll be playing the same note (the A)! A finger switch from 4 to 3 and my thumb a fifth higher is all that’s needed.”

Now you can practice the RH with the Play/Place Technique, playing the bracket with the duplets and then landing the 5th without playing it. When each hand is easy, you’ll do the Play/Place Technique with both hands at the same time.

For the quickest success, you won’t actually play the rolled chord, let alone the rest of that new measure, until you have fixed the problem with the transition.

Use the Play/Place Technique and Talking Out Loud to Fix Those Musical Mistakes

So why do you always stumble in the same spot in your music? Every time you stumble, your brain is raising its hand, asking for help. It’s telling you that you haven’t given it quite enough information for it to tell your fingers exactly what you want them to do, so they’ll do it, every time.

And how to fix it? If you take a moment to give your brain careful instructions, plus practice with the Play/Play Technique, you will conquer the spot–and your terror–allowing you to achieve flow though your piece much faster than if you just keep powering through and hoping for the best. I’ve seen this combo of the Play/Place Technique and talking out loud work over and over, for both myself and my harp students. Give it a try!

Sometimes, we all need help seeing the issues we face as harpists and, even harder,  figuring out what to do about them. Helping students do that is my job and my passion, and right now I am taking a few new harp students, online or in person (in the Denver area). Let me know if you’d like to have someone coaching you to help you reach your own harp’s delight.

This post has been edited to include the example from Clair de Lune.

The Lever Harp and Key Signatures

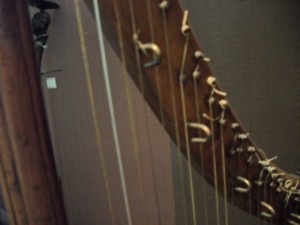
old hook harp closeup

Before I talk about the lever harp and key signatures, it might be interesting to think about why the technology of levers evolved at all.  The picture above is close-up of an antique harp in a museum in Europe.  See those funny hooks near some of the strings?  Those are early levers, awkward little beasts that required twisting.

The idea then was the same as it is now:  by putting pressure on a string, pinching if off against the neck of the harp, one can shorten it.  Shorter strings vibrate at a higher pitch, so we can thus create a “sharp”, for example, changing the F string to F#.  Doing this changes a harp from a strictly diatonic instrument (one which can play in only one key at a time, without any accidentals), into a much more versatile instrument.

However, hooks and early levers were not only difficult to use but not terribly accurate.  Yay for the luthiers who persevered over the course of the twentieth century to give use workable, accurate sharping levers! Modern levers are little marvels, allowing smooth changes and allowing the strings to ring true even when “pinched”.

Nowadays, most levers harpers, once they’ve cut their teeth on the first method book and endlessly plumbed the depths of the key of C, find music in other keys that they wish to play.  Perhaps you have reached this crossroads yourself?

As long as you still tune your harp in the key of C (with the levers down), you are stuck with keys going in only one direction: up.  This means sharps–and keys that use sharps–are the only next option.  Unless, of course, you start retuning your harp with flats, in which case you gain the versatility of one or more flat keys.

How is this possible?  On the simplest level, if you tune strings flat, you use some of the levers to create “naturals”.  You still raise levers, they still raise the pitch of the strings, but because the strings were flat to begin with, you are not creating sharps (that would require levers that pull up the pitch twice, which is why the pedal harp evolved . . . but that’s another story).

If you would like to begin to learn more about tuning your harp in flats (specifically, the key of Eb), you can read this.  If you would like to read about it in greater depth, I have created a free pdf about the lever harp and key signatures that takes you through the process of working from the key of Eb all the way to the key of E, lever by lever.  Along the way, you will be introduced to (or become reacquainted with) key signatures and the circle of fifths.  If you follow along on your harp a few times and fill in the worksheets, you will not only start to understand the theory better, but also become more confident that you can put it to good use. You’ll find the free pdf at the bottom of this post.

By the way, if you would like personal help with this or are otherwise ready to take your harp learning to a completely new level, I currently have a few openings for students (no waiting list for in-person or Skype lessons!).

You can also visit my studio site and read reviews from other students. Please contact me right away if you want to be encouraged and inspired.

Download your pdf here:

The Lever Harp & Key Signatures


Improvise with Seventh Chords in Open Voicing

Last month we improvised with some cool seventh chords, voiced “cluster” style (officially called closed position). For an even more lush, modern sound, let’s improvise with seventh chords in open voicing. We’ll use the same four chords: Cmaj7, Am7, Fmaj7, G7. Instead of playing the chord with four fingers in your left hand, we’re going to open them up and use three fingers of each hand.

In your left hand, play c, g and b (like the open voicing on a simple C chord, but with a b instead of the second c). In the right hand, play e b and e (the third, the seventh again, and another octave of the third). Between your hands, you’re now playing all the notes of a Cmaj7 chord, in an open (spread-out) voicing. You build the other chords the same way. Here they are spelled out for you:

Finger LH
4
2 1 RH
4
2 1
Cmaj7 c g b e b e
Am7 a e g c g c
Fmaj7 f c e a e a
G7 g d f b f b
chord degree 1 5 7 3 7 3

Notice that there are always two empty strings between your two hands, and you’ll find the positions more easily. Once you understand the pattern, you can of course play any chords in the key with the voicing. But for now, try to play through the sequence above, rolling the chords in each hand as one unit or playing arpeggios, until you get very comfortable with the progression.

Once you know the progression inside and out, you’re ready to embellish it with improvisation. To start, try adding “filler” notes in the right hand, e.g. the notes between the upper tones of one chord and the next. For example, between Cmaj7 and Am7, you might walk between and around the notes e and c. Just relax, experiment and have fun!

This post is adapted from material that I originally published in the ezine, Notes from the Harp.

Improvise with Seventh Chords

For a lush and funky sound, we’re going to improvise with seventh chords. Here are the chords to use (familiar from Heart and Soul, but turned into sevenths); Cmaj7, Am7, Fmaj7, G7. Right now, you don’t even have to understand how those chords are constructed, because I’ll give you the notes.

Using just your left hand, place b on the bottom, then, c, e and g (the C major triad with a b added to the bottom of it). The b is the seventh, added to the bottom instead of the top of the chord (and thus they are “inversions”, one possible way to turn the chords upside-down). Don’t worry about your right hand right now, although you can of course play these chords with either hand. You build the other chords in the progression the same way. Here are the chords spelled out for you:

LH Finger 4 3 2 1
Cmaj7 b c e g
Am7 g a c e
Fmaj7 e f a c
G7 f g b d
chord degree 7 1 3 5

Once you understand the hand form, you may want to play seventh chords up and down the scale, all over your harp. Then, try to play through the sequence above, rolling the chords in your left hand, until you get very secure about which chord comes next.

To begin improvising, try playing any notes from the chord in your right hand as you play each chord with your left. Find pleasing notes that connect the chord tones, and you’re on your way to creating your own melody. Remember, there is no test . . . this is about having fun with sound!

This post is adapted from material that I originally published in the ezine, Notes from the Harp.

Improvise with Pachelbel Canon

The idea that one would improvise with Pachelbel Canon is not too revolutionary; the whole piece is a series of variations that would have been improvised to begin with, as that’s what musicians in the Baroque era did.

So this is a  fun way to become more comfortable with that oft-requested piece AND learn to improvise at the same time. It’s especially useful to free up your right hand. Pachelbel’s Canon makes us of the same chord progression over and over:

I V vi iii IV I IV V

In the original key of D, that’s D A Bm F#m G D G A. Play just the root of each chord in your left hand. Notice that you go down a fourth, then up a step, down a fourth again, until you get to the final two chords. (Don’t have levers? The chords in C are: C G Am Dm F C F G).

Now for the fun part! With your right hand, you will be outlining the chord tones to create patterns. It will be easier to play and sound a lot better if you use inversions of the chords to keep them closer together and “under your fingers”. Here’s the progression with slash notation to show you which note is on the bottom of the inverted chords (say, D over A, and play A on the bottom, with D and F# above it, otherwise known as a 2nd inversion D chord):

canon chords D

(Click images for larger versions)

Or, in C:
canon chords C

Practice finding the chords in your right hand while playing those roots in your left hand. (Don’t rely on reading them; practice finding the shapes). When you know where they are and can find them reliably, you’re ready to play with them. Remember that the left hand simply plays the chord root on beat one; the right hand will fill the whole measure with notes based on the chord.

Here are some patterns to try:

*Play with rolled chords; two half notes per measure
*Start with the top note; play down and back up in a pleasing, regular rhythm
*Play the chord tones plus one extra “color” note in each measure (a note between two chord tones. If you don’t like how a note sounds, simply move on)
*Play the chord downwards in a triplet pattern (one triplet per beat)
*Create a meandering melody that wanders around the chords

Now its your turn. Anything can work. Regular rhythmic patterns will sound more classical, but how about some syncopation for a Latin canon? What rhythm would you use to make a rock-inspired canon? A dreamy New Age canon? Keep playing and experimenting, and you will stumble into new patterns for your right hand. Have fun and make it yours!

This is the original cool Pachelbel video, the Pachelbel Rant. Rob Paravonian demonstrates just how often this chord progression shows up in music, and you will laugh through the whole thing. Go ahead, watch it again . . .

Pachelbel Rant

This post is adapted from material that I originally published in the ezine, Notes from the Harp.

Improvise with the Blues

It’s fun and easy to improvise with the blues on your harp. The traditional blues progression is really quite easy. It consists of 12 bars in 4/4 time with a set progression. The simplest traditional chord progression is
I I I I
IV IV I I
V IV I I.

In the key of C, that would be
C C C C
F F C C
G F C C.

To keep that steady blues beat, you play the chord on all 4 beats of each bar, so you might think of it like this:
CCCC CCCC CCCC CCCC
FFFF FFFF CCCC CCCC
GGGG FFFF CCCC CCCC

Playing straight chords on every beat is tiring and can sound muddy on the harp, so it’s better to play open chords or alternate between the root and the other two notes from one beat to the next. To begin with, try playing just the chord roots (the note C for four measures, and so on).

Here’s another easy alternative that keeps the steady beat and is harp-friendly (click image for larger version):

Blues-Patterns

Right now, your goal is to play something in your left hand so simple that you can keep it going while you improvise with your right hand. So stick with chord roots if this pattern is too much to remember right now.

With your right hand, play only notes that are part of the chords you’re playing or even just play the chords twice on beat one and then rest for three measures.

If you’re an intermediate player, and that feels easy, you can get fancier. Remember, though, that the blues is very repetitive; you might only play on beats one and two with your right hand, for exmaple, and play a similar rhythmic pattern for every measure.

Here’s another intermediate idea:

Blues-RH

Now, you may have noticed I put some flats in there. If you know your chords, you’ll notice that some of the chords have become dominant sevenths in the process, though I haven’t marked them that way to keep things as simple as possible. If I’ve lost you, just go back to the easy level of this improvisation play chord roots in your left hand, play sparingly and without flats in your right hand, and have fun!

For those of you who want a little more depth, I’m going to explain a bit more. The thing that gives the blues its jazzy flavor is the blues scale, which also includes several flats. Here is the whole blues scale in the key of C (click any image for a larger version):

Blues Scale

The blues notes add the pizazz, but notice that their natural counterparts are also part of the scale. What’s a lever harpist to do?

For starters, on most lever harps, we need to use F# instead of Gb. Fortunately, the Gb is the least important blue note, so feel free to leave it out or save it for occasional punch.

You really need to play B-natural on the G chord and E natural on the C chord. One of my favorite ways to play the right hand is to put the Bb and Eb in the middle octave (right above middle C) and play with my RH in that octave when I’m on the F chord, but play up an octave to catch the naturals when I’m on the G chord. On the C chord, I also play up an octave so that I’m avoiding Eb, but I catch the Bb sometimes from just below that C. This is far simpler than it sounds and far easier than flipping levers all the time. (My right hand pattern above works this way).

If you’re up for a challenge, or you’re an advanced player, you can experiment with lever slides to ramp up the variations between the flats and naturals. If you get bored and ready for something different in your left hand, you try playing with the traditional blues bass line

blues-bassline

To make the bass line more playable, play every note with your thumb (with the thumbs-up position) and play C instead of Bb. (You can keep the Eb if you’ve set that in the middle register for your RH anyway). You may want the play the first two measures on line 3 up an octave higher, especially if you have a small harp. In that case, either leave the Eb out (play F), or play simple G and F broken triads in those measures (G B D B, F A C A).

If you’re struggling, go back to the easy chords and keep that beat going. The RH can really be so simple–play 2 eighth notes on beat one and then rest for the remainder of the bar and you’ll be in the blues groove. And if you have a playing partner, take turns: one person can play the chords while the other “solos”.

Have fun!

This post is adapted from material that I originally published in the ezine, Notes from the Harp.

Improvising Over the Chords

What do I mean, improvising over the chords?  I’d like you to try improvising with a piece  you already know, or at least with its chord progression. If you’re an intermediate player, you could also start with a simple arrangement for piano, such as Amazing Grace (level 4, first page only) on Gilbert Benedetti’s Free Music site.

Now, if you’re more experienced, perhaps you could play the left hand as written. However, it will be far easier if you start by playing the chords in their simplest form in your left hand (this is where your music theory comes in handy.  You did label those chords, didn’t you?)

First, play through the left hand chords alone. Next, play the chords again, and play anything you want to in your right hand ~ anything except the melody, that is.

At first, unless you’ve done this before, it will feel awkward as you search for something that sounds good.  You may want to start by simply pulsing the chord root in your right hand on every beat, just to get the two-hand coordination going.

Then move on to creating little lines of moving notes in your right hand. Don’t know where to start? If you get stuck on a chord, keep playing that one chord while you try different notes in your right hand. Next, do a single phrase until you like it, instead of trying to work the whole piece.

If you can keep the left hand going as written and feel a little braver, try this: keep playing that left hand, let’s say five times through, while trying different patterns of single notes in your right hand. If you stick with it, you will find pleasing snatches of melody that you like and you will start to repeat them when you get to that spot again.

Here is one suggestion to try with your right hand. If your left hand is playing a G chord, try all the notes from g to d (the G triad and the two notes in between those strings). When the chords changes, the of course the five notes you can play change to match.

One more tip: if you want to be able to focus on your right hand without worrying about your left, why not record the left hand chords (or original accompaniment) and play along with only your right hand?  That way, you can really explore.

Most of all, have fun!

This post is adapted from material that I originally published in the ezine, Notes from the Harp.

Improvising with an Ostinato

Let’s play with a repeated pattern called an ostinato (a constantly recurring musical fragment). When improvising with an ostinato, you can play the ostinato in either hand, but let’s try one in the right hand.  Tune your harp or set your levers for the key of C; with your right hand, put finger 3 on g (just above middle c), finger 2 on a, and your thumb on the high d .

Practice playing these three notes in succession, either from the top down or the bottom up (see which you like best). When you can do this with a smooth, rippling motion, you are ready to add you left hand.

Use your left hand to play chords and single notes alternating below and above your right hand. Start simply, by “dropping in” single long notes, once per ostinato pattern.  When this is easy, try open chords (for example, d a d, or an octave plus the fifth) in the bass. Have more fun by crossing over to play closed chords, thirds or sixths in the treble.

It doesn’t matter what you play, as long as you like it. Strive to keep the right hand going smoothly as you let the left hand roam. Remember to use some repetition in your left hand to create structure (if you like it, do it again).

Give it a try–it’s fun!

This post is adapted from material that I originally published in the ezine, Notes from the Harp.

Improvising Right Hand Patterns

We’ve spent a lot of time in this blog focusing on left hand vamps and patterns for improvising. That’s all good and well, you say, but what do I do with my right hand?  Let’s look at improvising right hand patterns today.

First, remember that simple is good ~ start with just a few notes. In fact, if you’re improvising with a new pattern, the first thing to do is to add a simple repeated note on every beat with your right hand. Sounds easy, right? But sometimes, even one note is enough to show us that our left hand needs a bit more practice.

Once one note is easy, expand to three. For example, if you’re playing a Dm chord in your left hand, you have the notes D, E, and F available for your right hand. They’ll always sound consonant. Once three notes is easy, expand to five. In our example, you would add G and A.

We’ve talked before about white strings, and how they always fit if you’re playing in the key of G, so next try using any white strings while you play G and D chords (you can play the D as a neutral chord, leaving out the F# third, if you want to avoid flipping your levers for now).

Here’s the way to make your doodling sound like music: if you hear something you like, play it again. Or play part of it, changing the ending. Or play the same rhythm with different notes. It’s structure that pleases our ears, so don’t be afraid of it.

Now let’s branch out a bit. We’ll put a really simple chord in the left hand–let’s say that neutral D chord (D and A, played together). Now play thirds and sixths (two notes simultaneously) in the right hand. When you hear something that sounds dissonant to you, just move on to something else.

Try “climbing the ladder” with alternating thirds: d f, e g, etc. Try it going down, too. Try seconds instead of thirds; d e, e f, g a . . . Try playing different rhythms, too (long short or short long).

Ready for something a little different? Try the following triplet pattern over the C chord (click on image for larger version):

Triplets

Notice that while this pattern sort of works over the C chord, your ear would really love for you to change chords. Try changing to a new chord on beats 1 and 3, thus: C, F, G, C over the two measures of the pattern.

Now it’s your turn. Play with scale fragments and runs and repeated motifs. Keep your left hand simple and uncluttered with block chords, especially if you’re using more than one chord. Let your right hand experiment until you find patterns that make you happy. Repeat and vary them. They’ll become part of your personal style!

This post is adapted from material that I originally published in the ezine, Notes from the Harp.

Improvise with a Roving Thumb Pattern

If you like to improvise, arrange and/or compose music, you have probably collected some favorite patterns for your left hand. A quick look at most Celtic harp books will show some very common patterns, such as rolled chords on beat one, three note arpeggios (4 2 1, anyone?), and various combinations of chords and extra notes in an “oom pah” style. One of my favorites is a rocking arpeggio with a changing top note, known as the “roving thumb.” This post will teach you how to improvise with a roving thumb pattern.

To start, find this pattern on your harp by putting 4 2 1 on the notes low C, G, and middle C. Play them from bottom to top, back to middle, and then to top again, but this time moving your thumb to D. Next time, play E with your thumb, and then once more back to D. The music below shows this sequence written out (click image for larger version):

Roving thumb 1

Practice this pattern on just this one chord until it feels natural. When your left hand is playing a busy pattern like this, you can bring in something really simple (whole or half notes) in your right hand, and it will add a lovely contrast. Once this is easy, you can graduate to other chords. You just need to find the root, the fifth, and the octave of any chord, and add the walking notes above the octave.

Next, you can try a faster rhythm with a roving thumb pattern that travels further afield (all the way to F on the C chord):

Roving thumb 2

Again, spend lots of time practicing the pattern, applying it to different chords.

When you’re ready, steal the chord progression from a simple tune you know and turn it into an improvisation.  Try playing 2 measures of each chord using one of these patterns, playing just your left hand until that’s easy.  When you’re ready, adding thirds or sixths as long chimes in right hand can be lovely.

Have fun, and keep improvising!

This post is adapted from material that I originally published in the ezine, Notes from the Harp.